223 Silent Lash Valvetrain

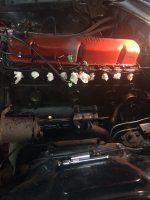
Peeot, here is a picture of my valve cover shortly. On aside note, I put the recommended quantity of Marvel Mystery Oil in the pan and the tank. I actually think it is making a difference. Hopefully it is releasing those rings. Even if the marvel works I will still rebuild the engine this upcoming winter. IMG_1446.JPG
 
Peeot, here is a picture of my valve cover shortly. On aside note, I put the recommended quantity of Marvel Mystery Oil in the pan and the tank. I actually think it is making a difference. Hopefully it is releasing those rings. Even if the marvel works I will still rebuild the engine this upcoming winter. View attachment 5750
To my knowledge, there were 2 different styles of 223 valve cover with the perimeter bolts (starting in 1960). One style has a rounded top and the other style has a somewhat squared-off top. The squared-off style leans over to the driver side of the engine slightly to clearance the silent lash rockers. It looks like you have the earlier, round-top valve cover. Look at it carefully from above and from the front. Does it appear to be perfectly symmetrical, or does it lean a bit toward the driver side of the car? If symmetrical, you may have a clearance problem like I did.
 
It seems to be symmetrical. I will check further. The last time I had the valve cover off I did not see any marks on the top. I say that because I repainted the valve cover inside and out. I will verify that though. Thanks for the heads up.
 
Well just to give everyone an update. Two things
1. I replaced the aftermarket distributor with a 1961 223 dizzy out of a truck that I found on e-bay. I also got new points for it and a condenser. I slapped that in and retimed the motor (again) and to my surprise the motor idled better then ever. I had to adjust the springs for the low and high vacuum settings but got it running really well. I then proceeded to put my pertronixs unit in the distributor. It ran horrible! So I am back to points which is fine with me, until I put in a full electronic unit. The valves still chatter but not as bad, and they actually don't chatter at all under 1,500 RPM. I checked the inside of the valve cover (per Peeeot) and nothing is hitting.
2. I am going to rebuild the motor this upcoming winter and spoke to a local machine shop. They will do everything that is needed and replace all the internal components of the motor for $1500. I was going to do all of it myself except for the machining, but at that price I will just let them do it.
 
In preparing for pulling the motor to send off to the machine shop, I was looking through the shop manual and found that they use a special jig that pulls the motor by the intake/exhaust manifold. Since I do not have that... how do you guys recommend me pulling the motor?
 
For decades I would use a good quality chain run diagonally across from one side to the other using at least 3/8 inch bolts or bigger with a large enough flat washer so that the bolt can't pull through a chain link and mounted securely into the short block were there is a strong boss. Then i use a long enough 5/16 to 3/8 inch bolt that can fit through the chain links to from a loop large enough for the lifting hook of my engine lift or chain hoist adjusting its position front to back to balance the out engine weight this takes a little practice to get it right. Much better solution today and safer is to use one of these engine levelers were you can then change the angle of the engine as maybe needed on the fly instead of using your muscle strength, which is getting harder for me to do. (see link below). Best of luck Edited

Engine Leveler
 
For decades I would use a good quality chain run diagonally across from one side to the other using at least 3/8 inch bolts or bigger with a large enough flat washer so that the bolt can't pull through mounted securely into the short block were there is a strong boss. Then i use a long enough 5/16 to 3/8 inch bolt that can fit through the chain loops to from a loop large enough for the lifting hook of my engine lift r chain hoist adjusting its position front to back to balance the out engine this takes a little practice to get it right. Much better solution today and safer is to use one of these engine levelers were you can then change the angle of the engine as maybe needed on the fly. (see link below). Best of luck

Engine Leveler
Thanks Bubba. I was actually looking at them today. For the bolt holes.... I was thinking a bellhousing bolt hole in the block for the back, and for the front I am kind of unsure. Any suggestions on the front bolt placement?
 
On the front side one good and strong point you can use is the short block bolt boss that the Generator mounting bracket bolts onto. Yes the bell housing mounting is good, note that the wider you can space you chain mounting points from front to back the more stable the engine will be. Good luck
 
One last question for clarification purposes. The engine shop where I am taking my motor is going to be getting a full rebuild kit which includes the non-silent cam. Since this is a silent lash motor and there it is a difference of .13 between with lift on a silent lash (.260) vs non-silent (.273) cam should I replace the silent lash rocker assembly with a standard rocker assembly to make up the .13 difference, or do you think that there is a enough adjustment in the silent lash assembly where .13 won't make a difference. I understand there is a variable in this with the thickness of the head gasket and also how much will be shaved off the head and the block. I would rather buy the non-silent rocker assembly then go and get new pushrods.
 
UPDATE: So the engine is at the builder. He said everything looks good for a 1961 engine. There are two things he noticed on the initial inspection.
1. The cam is shot.
2. The exhaust valve guides are loose.

I am thinking both of those conditions would result in the typewriter valve train noise that I was experiencing. He is going to provide me with more updates the further he gets into it. He said the head looks good although he is still going to pressure test it for leaks.
 
Yes those conditions of extra wear can cause an increase in the valve train noise. New valve guides or guide liners will fix the head back to like new condition so that is easy enough to fix. The zero lash camshaft is a different part number than the standard rocker arm cam and might be hard to find. There are a couple of places I can recommend to look or you can also get your cam reground and maybe even the lifters at Schneiders Cam's http://schneidercams.com/regrindform.aspx
 
Bubba,
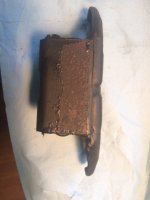
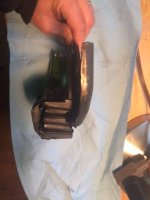
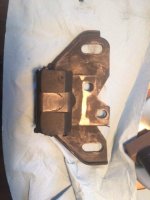
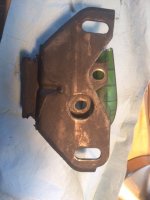
Thanks. I already purchased a rebuilt silent lash rocker arm assembly earlier in the year per your recommendations. One thing I found when I pulled the motor and the transmission is that the transmission mount is kind of worn. It just seems extra wobbly even though there are no cracks or tears in the rubber. I cannot find a replacement anywhere. I was wondering if you or anyone out there has any recommendations for replacing the transmission mount. Here are a few pictures of it for reference. By the way the tranny is 3 speed manual.
IMG_1592.JPGIMG_1591.JPGIMG_1590.JPGIMG_1589.JPG
 
Hi Sickboy49, you will only need to replace the rubber part If it's deteriorated from age, years of operating stress and weight, or from oil / grease saturation, the new rubber part just slides right onto the original steel part. Don't know what area your in but I had an excellent NAPA dealer that was great at finding these old parts. I know it can be hit or miss now days depending on the area your in or the people working at the store the last one that was able to get me parts quickly was the NAPA parts Warehouse out in the Fontana Ca. area but that no been quite a number of years. My new locale dealer here in Flagstaff seems to have a few great parts counter guys too and that's what counts however on the older parts they have to order it in from Phoenix. Another great source I have used for these era Fords was C & G Ford Parts in Escondido, Ca., they have the part listed and they use the original Ford part number so you can use that to help you cross reference when you are searching parts from other sources, see the below link. There are some other antique Ford dealers to that might still carry these parts for these old Fords like Mac's, etc. I think the Damper Doctor was also rebuilding some of the bonded type motors mounts for the older engines. https://cgfordparts.com/ufolder/cgc...htextdesc=Trans+mount&sd=Search&searchnumber=
 
The cam lift difference is not .13, it is .013.
Not all that much.
Not sure how happy it will be working with the zero lash rockers, by if it has any issues, they likely won't be because the small difference in lift.
 
One last question for clarification purposes. The engine shop where I am taking my motor is going to be getting a full rebuild kit which includes the non-silent cam. Since this is a silent lash motor and there it is a difference of .13 between with lift on a silent lash (.260) vs non-silent (.273) cam should I replace the silent lash rocker assembly with a standard rocker assembly to make up the .13 difference, or do you think that there is a enough adjustment in the silent lash assembly where .13 won't make a difference. I understand there is a variable in this with the thickness of the head gasket and also how much will be shaved off the head and the block. I would rather buy the non-silent rocker assembly then go and get new pushrods.
Sorry somehow i didn't see this post before. I think this can be a bit of a problem yet you wont really know how much until its all back together again if possible that you have the time I would look for the right cam or see if Schneiders Cam's can fix yours to the be at the right specs or maybe even a little more lift. You can also try contacting John Mummert at ford-y-block.com about that cam he also use to have lots of the 223 Six parts including some custom performance cams. I don't know what he carries right now though. But he dose still list the T5 5.0 5 speed Adapter kits for the 223 Ford Six'es and the Y Block V8's.

The head gasket difference can be fixed just by milling the head the extra amount of the thickness difference or a little more of the original head gasket thickness so your push rods are the right length and you regain your original Compression Ratio or more again. However having the .013 less valve lift that Bill (good catch I completely missed that for some reason) just brought up is not good its like cam is already worn down again there would be a slight lose in power too over what it should be for anew engine. I don't think there an excessive amount of oil adjustment with those zero lash rocker arms.
 
Bubba and Bill,
Thank you both very much for the advice. Instead of replacing and re-milling I will just get a rebuilt (regular) rocker arm assembly. That way I can get the original cam re-milled at my leisure.

Bubba,
Thanks for the link. I will check them out.
 
Back
Top