
You are using an out of date browser. It may not display this or other websites correctly.
You should upgrade or use an alternative browser.
You should upgrade or use an alternative browser.
All Small Six 200 6 rebuild steps
- Thread starter adobejoe
- Start date
This relates to all small sixes
Also, you have the pin in cock eyed, it needs to be straighter, and I think, in a little farther go slow and be careful.
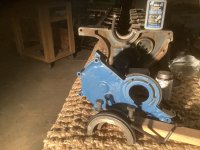
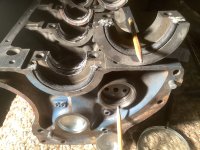
Have the spacer rotated, pin in snug and starting on the crankshaft. On the rear main seal, the kit comes with two rubber seals, and two rope seals. I assume the rubber seals are for the “outside “ of the rear main cap or retainer. Goes between the rear main and oil pan? The smaller rubber goes on front of engine betweencrank and timing chain cover. Question about the rope seals is where to meet the two ends. I assume rotate so not in line with edge of block. Also, do you use a sealant where they meet? Type? I hate oil drips and want really prevent that coming over the edge of oil pan or at rear main. See pics
Attachments


That's right very Good! I see you also have all the front and rear Oil Galley Plugs installed now. Very Good! You will still need the Rear Camshaft Soft Plug and the Rear of Block Freeze Plug installed sometime to. Use the Permatex Aviation Cement to seal these two and also any other of the Block Freeze Plugs that aren't installed yet. Some People as a preference will wait until they have Painted the Short or Long Block Assembly if they want their Brass or Steel Freeze Plugs to show in their natural finish.Have the spacer rotated, pin in snug and starting on the crankshaft.
You can put a very small bead of Silicone into the 90 degree corner of where the Blocks Main Cap Cut Out is before putting in the Main Cap and Torqueing it down. You could also put a very very small amount at the outside of the Rear of Block and the Rear Main Cap's edge near the external Parting Lines but don't go crazy there. I don't follow you on the front of engine between crank and timing chain cover for the seals unless your talking about the front Timing Cover Crankshaft To Damper Seal? If it is than this get driven in from the back of the Timing Cover with a Seal Driver or Socket that's the correct diameter size could also be used.On the rear main seal, the kit comes with two rubber seals, and two rope seals. I assume the rubber seals are for the “outside “ of the rear main cap or retainer. Goes between the rear main and oil pan? The smaller rubber goes on front of engine between crank and timing chain cover. Question about the rope seals is where to meet the two ends. I assume rotate so not in line with edge of block.
Not sure one those two Rubber Seals your talking about, I would need to see a picture of them to know. Are they the Neoprene type Rear Main Seals look like a Half Circle? Which Type seal did your engine have in it originally Rope Seal or Neoprene Seal?
X2 If your engine had a Rope Seal in it than it would or should of had a Pointed Pin in the Rear Main Cap to help keep the Rope Seal from Spinning / Turning in the Blocks & Cap Grove, so if your using the Rope Seal again and have that Pin then your all set. If your engine had the Neoprene Seal before and you don't have the Pin you can make a suitable replacement out a small Finish Nail of about a 3 or 4 Penny cut to length to fit.
A rope Seal gets pressed / worked into the Short Block's Rear Main Seal Grove and the Rear Main Cap Grove snugly, I use a Large enough Diameter Socket that closely matches the Crankshafts Main Bearing Surface Diameter to push the Rope Seal snugly down into the grove by hand and than also tapping it in a little more with a Composite Dead Blow or a Brass Hammer to compress them well into the Grove. The Rope Seals are not rotated in the Grove (only the Neoprene type Seals are clocked in the groves note that these seals are now currently very hard to find). The Rope Seals are then cut down to about 1/32 to 1/16 of an inch above so they are no lower than flush with the Blocks Main Saddle Parting Line and the Main Cap Parting Line after they have been tightly fitted into the Block and the Main Cap groves. Now after you have finished installing of the Rope Seals and the Main Cap is installed and Torqued down correctly then your ready for the rest of the Short Blocks Assembly. Edited
These Rope Type seals usually don't leak for a quite awhile, if you use a sealer than use it very sparingly like a small dab of Silicone on the end. Looking good. Edited for correctionsAlso, do you use a sealant where they meet? Type? I hate oil drips and want really prevent that coming over the edge of oil pan or at rear main. See pics
Hi, most guys will use the rubber rear main seal. If the engine had the rope seal when you took it apart there will be a pin in the bearing cap to hold the rope seal. This pin, if it is still in place, needs to be driven out, and the hole filled with silicone sealant if you go with the rubber seal.
Also, the cam thrust plate has grooves for oil flow. I seem to remember some have the grooves on one side, and some have grooves on both sides. In any event, you need to be sure there are grooves facing the block. Good luck
Also, the cam thrust plate has grooves for oil flow. I seem to remember some have the grooves on one side, and some have grooves on both sides. In any event, you need to be sure there are grooves facing the block. Good luck
I stopped at "I have the prts'n manuel..." in 1st post. I'm probably too late but have one early suggestion (beside the echo vid).
On the paint: several builds I've done have had great results due to the following treatment. Others, w/o it, not so much.
When I run a flame (MAP gas, butane, propane, oxy) over the block it has held the paint after, so much better. Cast iron is porous. It absorbes water (just as wood/other things do). When I run a flame over it pulls that out rather than pushing the paint off from behind @ later date. Justa fyi~
Thanks Chad, I did not torch it, so will just see with time. The two rubber strips appear to go against the oil pan, as shown on pic. Allen wrench point to one rubber piece, timing chain cover (or whatever the correct name) has second rubber piece. I am curious if I can use a sealant or gasket cement, if that would help. The rope came in two pieces and I will trim, as shown on the echo videos, after all today is the first day of the rest of my life, so I better get it right! I will use a dab of silicon at the joint, I do not want this engine to drip oil!
Attachments
Hi, the rubber seals are part of the oil pan gasket set. They both look too short. The ends should sit on the block surface. For some reason the rope seal looks like it is not in the right place. I remember the rope seal sitting just proud of the block surface on both sides. You really need to consult a Ford or Chilton manual to get this right. Good luck
Can you post a picture of the Rear Main Cap showing the inside of the Seal Grove? In your above Picture you have the Rope Seal down below the Parting Line on the Right side. Just so you Know these type Rope Seals can not be installed with it Clocked like that. See my above Post for Correct Rope Seal Install procedure or better yet look at a Ford Six Factory Assembly Manual. Also in your above picture it looks like there are some Burs or Surface Roughness on the Blocks Parting Line, if so these areas need to be lightly dressed up with a fine file so its nice and flat surface. I usually will do this lightly on all the Main Caps and the Blocks Surfaces so there will be a good fit. Good luck
X3 B RON CO nailed it yes those two Rubber Seals are for the ends of the Oil Pan the Cork Rail Gaskets get glued down with some of the Permatex Gasket Cement then those rubber seal's are installed on top of them. This is after you install the Oil Pump and Its Oil Pump Pick Up Tube and the Front Timing Cover. Set the Oil Pan on top of it with the Oil Pan Bolts installed loosely over night to hold down the Oil Pan Rail Cork Gaskets in place and lined up correctly. Then when you are ready to Finish the Oil Pan install use some Silicone on top of the Oil Pan Cork Rail Gaskets and in the corner were those Rubber End Seal meet on both sides of the front and rear. Keep up the Good Work adobejoe.Hi, the rubber seals are part of the oil pan gasket set. They both look too short. The ends should sit on the block surface. For some reason the rope seal looks like it is not in the right place. I remember the rope seal sitting just proud of the block surface on both sides. You really need to consult a Ford or Chilton manual to get this right. Good luck
Last edited:
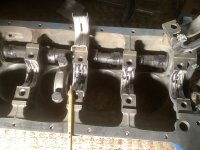
The thrust bearing does not go where you have it, it goes on the main cap spot marked with a T . the caps have to go the way they were machined at. They are numbered except the thrust and the rear cap, there is an arrow that points to the front. Sometimes you can match the witness marks on the mating surface of the cap and block Be careful it can be confusing.
We can help better if you post more pics of everything as you go.
We can help better if you post more pics of everything as you go.
Bubba, yes looked at the rope install. Need that nail, or pin, and seam at block edge. Cleaned up block and end cap with 800 grit on a flat to remove any burs. Will use a drop or two of silicone where rope meets on each end. Does anything go inside that dust/freeze cap area at end of cam shaft?
Drag-200 stand, thank you thank you for that blunder I had on thrust bearing. Relocated. See pic.
Drag-200 stand, thank you thank you for that blunder I had on thrust bearing. Relocated. See pic.
Attachments
Bubba, yes looked at the rope install. Need that nail, or pin, and seam at block edge. Cleaned up block and end cap with 800 grit on a flat to remove any burs. Will use a drop or two of silicone where rope meets on each end. Does anything go inside that dust/freeze cap area at end of cam shaft? Drag-200 stand, thank you thank you for that blunder I had on thrust bearing. Relocated. See pic.
Bubba, yes looked at the rope install. Need that nail, or pin, and seam at block edge. Cleaned up block and end cap with 800 grit on a flat to remove any burs. Will use a drop or two of silicone where rope meets on each end. Does anything go inside that dust/freeze cap area at end of cam shaft? Drag-200 stand, thank you thank you for that blunder I had on thrust bearing. Relocated. See pic.
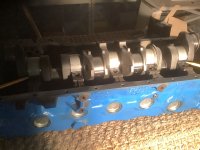
Need a reality check. Placing the bearing halves on the crankshaft as it sits loosleythey only meet or fit completely on the very front or number 1 cap. Going towards the rear of engine there is a gap. See pic and pencils. I assume this is normal, just center the bearing on the retainers and it enables lubrication.
Attachments
Hi adobejoe, that's great I am glad that you got all the Main Cap surfaces cleaned up and Flat. You can make a suitable replacement for the missing Pointed Pin to go into the Rear Main Cap out of a small finish nail of around a 3 or 4 Penney size cut to length. Take you Rear Main Cap with you so you can check the nails size Diameter is right for a drive in snug fit.Bubba, yes looked at the rope install. Need that nail, or pin, and seam at block edge. Cleaned up block and end cap with 800 grit on a flat to remove any burs. Will use a drop or two of silicone where rope meets on each end. Does anything go inside that dust/freeze cap area at end of cam shaft?
Nothing goes inside the Camshafts Rear Hole it's just an Oil reservoir for the Camshaft as the engine is running so you only need to install a Steel Freeze Plug of the correct size.
Can you do a picture with the bearing halves installed in the block? I can't make out in your pictures if you have the right half of the bearings in the Block to me they don't look like they have an Oil Passage Slot / Hole in them. Granted this could be just me not being able to see very good, I have waiting for quite awhile for my new glasses to finally come. X2 Yes that was a very good catch by "drag-200stang" on the thrust Bearing location that is so very important to get right.
The ends of the Rope Seal don't look right they are just to Ragged you will need to have very good trim on those ends, I hope they are not all ready cut to short. You need to use a Sharp Single Edge Razor Blade to trim the Rope Seal ends so the ends are nice and even at about 1/32 to 1/16 of an inch high and no lower than even with the Block and Main Caps Parting Line when the Main Cap has been Torqued Down to Spec. If you need to get a new Rope seal then their is an improved version that is made by a company that's named "Best Gaskets". Good luck
That is because the crank is not in place because of the rope seal, why are you placing the bearings on the crank, they go in the main caps. I failed at the rope seal and went with the two-piece neoprene, but they are hard to find, and people have been having trouble getting them to seal. Because you are not a seasoned engine builder, I would leave out the main seal till you put the bearings in the caps and some oil, torque them down in three steps that way you can see if there is a problem, with the friction of the rope seal you will not be able to tell that there is. With oil on the bearings the crank should turn easily. and then you can check clearance with Plastica-gage. If all is well then install seal.
Keep in mind this is not surgery it will not heal itself; this work is more precise than that, be careful.
Keep in mind this is not surgery it will not heal itself; this work is more precise than that, be careful.
Have cinched things up a bit. I used copious amounts of assembly lube on all bearing surfaces and that crank is tight!, I can rotate using a three ft bar leveraged off two of the bolts going into the rear of the crank, but man that does not spin easily. I am worried that when I tighten or torque up to 60-70 lbs it will be too tight to spin?. Would it make sense to install pistons and flywheel and starter and briefly spin on the bench? Just a couple revolutions with good lubrication?
Did you check your Crank to Main bearing Clearances by measuring them or with some Plastic Gauge? I would not install the Pistons and Rods or any other Parts until you have that crankshaft assembled right. X2 do as "drag-200stang" has suggested in his above post remove the Rear Main Rope Seals from both the Block and the Rear Main Cap then assemble the Main Cap and see how the Crankshaft turns. With the Main Caps Torqued down to spec and if its bearing clearances are right the crankshaft will spin very easy several rotations, just by flicking it by hand.