All Small Six 223 Engine opinions

This relates to all small sixes
Good to read that you got your head back with upgraded hardened seats. My 59 223 six is original. My late dad bought it new in Southern California. It has a retrofitted PCV Valve per California Smog mandate in 1966. The 223 six is one durable engine. Mine has over 228,000 miles on it with no overhaul, but needs it badly. My late dad and I used Gunk Motorflush every time we changed the oil and filter to clean the sludge buildup before pouring in fresh oil and zinc additive (STP). A rebuilder can rebuild your starter to work with a 12 volt system if you decide to have it upgraded. If it has a generator, it likely got upgraded to a 1956 to 1962 12 volt electrical system.

Thank you sir, So after a week or so of research, I found that b2az-6065a is I think the original part # for the pre 61 head bolts, they were 7/16, later head bolts were 1/2" not sure part #, maybe the one you have.
So the head that I have uses 1/2" head bolts and the block has 7/16" threads. Ford made bolts to put the new head on the old block. They are called shoulder bolts and have 1/2 shoulder annld 7/16" thread. Ford part# D3NN-6065-A. This is also an ag part for tractors, not many of them left. I found one for $44 and a set of four for $129 NOS. I scored the set of four for $75. I'll probably just use these 4 to line up the head and use cheaper 7/16" bolts for the rest.
Ford also made a stud to go the other way. !/2" threads on bottom & 7/16" shank 4" long. Then you put nuts on the top. Ford part# D3NN-6N014-A


A bit late to the party but those tubes are the OEM oil sending and return lines. The rear one (input) has the O ring seal the forward one (return) has no seal at the bottom. If you have not already I would suggest pulling out the cotter pin at one end of the rocker tube so you can remove a rocker and check the shaft for wear. Virtually all the wear occurs on the bottom half of the shaft....you can't see it till you pull one off though you may feel it if you can move the rocker up and down a small amount on the shaft. Photo shows the forward rocker removed and notice the wear on the shaft. I found some of the oil delivery holes to be partial plugged with oil sludge. The bushings in the rockers did not show as much wear visually and fit good on the non-worn area of the shaft. After much searching I did find an complete OEM re-manufactured assembly at Green Sales and after I put the word out a this and one other forum their stock of 11 quickly sold out. Mine is the later zero lash rockers while yours is the earlier version. There are soft metal plugs in each end of the shaft and you could pull these out for cleaning...as long as you have replacements in hand.....I have seen these available. If you need a new shaft you are going to have a search on your hands but I think the earlier rocker version is more common than the zero lash.
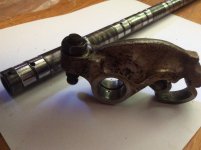
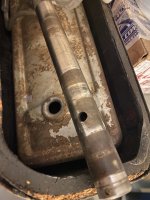
Man... See I thought I was just about to throw this thing together and you tell me this... šŸ˜‘ So should I reinstall those tubes? I believe you are correct about it not having a ring seal on the front tube because I took everything apart and found no seal and the tube isn't molded like the rear tube, also a bushing won't fit in the lower hole in the block with a bushing. However do I need this installed?
The head in it's entirety apparently was in good shape per the machine shop. His only concern was the valves being the ones used with leaded fuel. So I assume the head had never been rebuilt. And given it's condition, probably very little wear. However now I want to take it apart and see the wear on the rockers for myself šŸ˜”
 
Yes, put the tubes back in. The front one just fits loose into a hole down in the block....might require a little fussing it around the hole in the head to find the lower hole in the block but it will go. I have read some saying this tube delivers oil to the dizzy gear. This diagram shows that.

Itā€™s easy to slip off the first or last rocker so I would check that. The fact that the holes in the shaft can be plugged up with sludge and the sloppy fit of a worn shaft will really cause oiling problems, give yourself a little peace of mind. I did see a NOS older style shaft and rocker assembly at www.2040-parts.com for $150. Saw that today which prompted me to post this. They seem to show up more often than the later zero lash ones like mine.

Edit: Scratch that rocker shaft....looks to be outdated listing.....part number was listed as EAA 6563 A.
 

Attachments

  • 40B1684E-8FAF-4243-86AA-6035223B59F5.jpeg
    40B1684E-8FAF-4243-86AA-6035223B59F5.jpeg
    447.1 KB · Views: 13
Last edited:
Here is what I did. Being I had a new assembly I decided to mess about with the old one. The rockers will all slide off easily but the 6 tower supports MAY have very tight fit. They seemed to catch on the cotter key hole so take something and take the edge off that hole. I still had to use a hammer and tapping the end of the shaft to drive it through some of the towers. At times I could twist them back and forth and a few came off by hand but it was not easy. You will see they have a little V cut out on the inside so when you torque down the tower bolt it clamps down on the shaft. To make it easier to reinstall them I took the small brake cylinder hone (the one with two stones) chucked into a hand drill and honed out the towers very, very slightly. Using brake fluid I would run the drill for 5 seconds then check the fit. I donā€™t think any of them had more than 20 seconds total. They still had a tight fit but I could easily move them around on the shaft though getting them on the first inch of the shaft was the harder part. Torquing down the tower bolts should clamp them down again. The rockers have an oil passage so clean that out. You will notice no wear on the upper half of the rocker bushing. There is wear on the bottom half but visually it was hard notice a difference in the thickness of the bushing top and bottom. The shaft takes the vast majority of the wear. I soaked the shaft in diesel fuel overnight and it loosened up some of the sludge and it flushed out. I used a thin braided wire to fish it around using the large holes for access, with the end of the wire unbraided a bit it made a little cleaning brush. It knocked more stuff loose and it was easy to flush that out or pick it out through the holes. The better alternative would be to punch out the end cap plugs but I would only do this if a had replacements IN HAND. After chasing so many ghosts looking for these parts I was skeptical that I could find things. I did see the plugs listed at Rock Auto but I never pursued that. I did notice that the front oiling tube fit through the tower and down into the shaft. The rear tube just fit as deep as the tower....relieving you of having to have precise position of the two holes I guess. There is a little channel cut into the middle of the rocker bushing that lines up with the small holes in the shaft and the rockers to deliver oil.
 
Last edited:
Thank you for the great pictures! The above casting date codes for the head and block Decode as follows
The C1AE-6090-D this head has a date code of "2C28" that means that the head was cast at the Ford engine foundry on March 28, 1962. So this is a 1962 223 year model head.

The EBP-6015-F Design / Casting number is for a 1954 to 1959 223 bare cylinder block, the date code is "55C" this block was cast at the Ford engine foundry on March 5, 1955 making it a 1955 year model engine possibly original to your truck.

The above Vin Data Plate info Decodes as fallows.
F10D5A-29132
F10 = F100 1/2 Ton Conventional Cab with a Short Bed, 110 inch Wheel Base with a G.V.W. of 5000 Lbs. There were the standard base trim pickups and a custom cab option was also available on the 1955 F100's. A custom cab truck came with chrome Custom Cab door emblems and some other chrome features. I would need to see more pictures to ID the model trim. In 1955 Ford built a total of 124,842 F100 pickups & 11,198 F100 Panel's.
D = a 223 OHV 1V. (118 H.P. / 206 Lb. of Torque) Inline Six. 1955 was the first year that the 223 OHV Six was used in the Pickup's
5 = Year 1955
A = the trucks Ford Assembly Plant in Atlanta Ga.
29123 = Is the "Consecutive Unit Number" at the Atlanta, Ga. Ford Assembly Plant.

3= is the code for a regular 3 speed manual transmission
Rear Axle gear ratio = 3.92
Color U = Meadow Green the Ford paint code number is M-14283, PPG number is 40481. I think on Base models the grilles, parking lamps, and Wheels on the 1955 F-100s were all painted Snowshoe White. See Below for original color Paint examples on a 1955 Ford F100 'Custom Cab" Short 6.5 Ft. bed.
28G = ?
Production Code = "485C" don't know this exactly but it should be sometime in March 1955 since the engine block maybe original to the truck (cast on March 5th, 1955 it could be 18th or more likely the 28th I think the 4 has to be a miss stamped number. If you still had the 1955 head yet I think your truck from what i can see would be a very original example still.
Interesting, 1962 would make that a zero lash rocker head. I think the cams are different so it looks like they used the older style rockers so they did not have to change the cam.
 
I'm pretty sure my 63 has regular rockers. It may be that trucks didn't get them.
Interesting, 1962 would make that a zero lash rocker head. I think the cams are different so it looks like they used the older style rockers so they did not have to change the cam.
I think boxtop is right, he maybe used the old rockers because the mounts for the earlier valve cover is there. I don't know that much about heads and this is turning into a challenge for me. The rockers are not lining up perfectly with the valves and idk how to fix it. The machine shop took them off when they put the new valve seats in and now I'm stuck.
Also I decided to stick my magnet down into the cooling passages and there is alot of loose metal floating around in there. I'm trying to fish it all out and I'm certain This was causing the cooling issues. What I'm not certain about is what to do about it. I read that hot tanking the engine won't get rid of the rust so what does one do in this situation?
 
Last edited:
Did they just remove the rocker/shaft assembly or did they take it all apart? The rockers are positioned one tight to each side of the six towers with the springs between these ā€œsetsā€. The tower position is not variable so with the rockers on either side they have to fit. In the process of removing the shaft assembly it is possible that the position of the towers could shift slightly depending on how tight they fit on the shaft. Use the larger oil output hole in the forward end of the shaft lined up with the hole in the forward tower as your guide. Then work your way back lining up and lightly (finger tight) bolting down each tower. Checking that the hole in the front tower and the shaft remained lined up. Stick a small 1/4 inch bolt in there to keep it aligned if you have to. Post a photo of what you have.
 
So did they clean up the rocker assembly?
And if they did take it apart did they flip the shaft. On the zero lash this would be obvious due to the oil inlet hole being moved to the fourth tower. The early version has the oil in and out on the end towers so it may look symmetrical but is it....can the shaft itself fit either way or is there a front and back? Flipping the towers around would cause a very obvious misfit....so it shouldnā€™t be that.
 
Last edited:
I think boxtop is right, he maybe used the old rockers because the mounts for the earlier valve cover is there. I don't know that much about heads and this is turning into a challenge for me. The rockers are not lining up perfectly with the valves and idk how to fix it. The machine shop took them off when they put the new valve seats in and now I'm stuck.
Also I decided to stick my magnet down into the cooling passages and there is alot of loose metal floating around in there. I'm trying to fish it all out and I'm certain This was causing the cooling issues. What I'm not certain about is what to do about it. I read that hot tanking the engine won't get rid of the rust so what does one do in this situation?
Very good idea on getting those block coolant passages cleaned out there are ways to do this with plain water, soap, apple cider vinagur a pressure washer or regular hose tap pressure. are you planing to remove the engine and disassemble it? If not the best time to have tried to clean the block out was before the head was removed. You could bolt the head back on with the old head gasket (not valve gear and then flush it out then remove the head again and see how clean you got it.

To my knowledge I don't think that the zero lash rockers were ever offered as an option on the pickup trucks only on the higher trim level cars like the Galaxies, but I am sure that some Zero lash sets probably got swapped into a few pickups over the years with an engine swap. Technically the zero lash camshaft used with them is also a different part number as well as the lifters however I didn't see any obvious difference between the lifters, I was going to do a lift and duration measurement of a standard cam to compare to the new Zero lash cam that I had but didn't get around to it before i sold it.

The years of Rocker Arm assemblies should be directly interchangeable, with the major change in head castings being after 1959 yours being a 1962 head has the bolt down flange and its matching late style valve cover already so you don't need the center valve cover hold down studs that are used on the older 1952 to 1959 engines. As long as those studs are removed from the Rocker Arm assembly that would be all that needs to be done to use them on that 1962 head, from the pictures you posted i seen those studs are not there now.

I don't understand what your worried about as to the Rocker arms not lining up, how much is that? They are not going to be perfectly lined up to the center of the valve stems they are offset some this is how they are designed to fit, so the the valve stems will turn during engine operation. You did take the pictures of the rocker arms on the engine before you took the head off if you check back to those you can also see that the rockers are offset some, now is there any difference in how they fit now? Post some pictures if you want some additional help.
 
Last edited:
And if they did take it apart did they flip the shaft. On the zero lash this would be obvious due to the oil inlet hole being moved to the fourth tower. The early version has the oil in and out on the end towers so it may look symmetrical but is it....can the shaft itself fit either way or is there a front and back? Flipping the towers around would cause a very obvious misfit....so it shouldnā€™t be that.
I really doubt that they would of taken the time to disassemble the rocker arm assemblies maybe they put them in the hot tank or Jet washer at the most. I don't know that the shaft can be flipped end for end never tried to do that. I do know that in a pinch the shaft just be can be turned 180 degrees so that the bottom is then on the top so as to get less clearance movement and a fresh unworn surface for the rocker arms to ride against. It's better than nothing if you can't get a new shaft and or a rebuilt rocker arm assembly.
 
I don't think rotating the shaft is a good idea ever. The lubrication holes for the rockers would then be on the top where the largest clearance is. So you may get a drop in oil pressure, but for sure you would have absolutely no lubrication on the bottom where the two surfaces are rubbing together. Gone in 60 seconds, I think. That "fresh unworn surface for the rocker arms to ride against" would be melted before you ever got the valves adjusted. Even if you drilled new holes for the new bottom, you would have a lot of wasted oil pressure from the top holes.

Hmmm... Since the top is not a contact surface, drill through the hole to make a new hole 180 degrees around. Then a quick mig weld and then a concave grind to plug the holes. Adjust the location of the supply holes and now you just may have a new set to shafts! I think I have my new test project.

First photo is of the underside where the surfaces have the high rubbing pressure. Second photo is the topside. Notice the first rocker has so much clearance on the top, even the scum is not rubbed off.
 

Attachments

  • IMG_1440.jpeg
    IMG_1440.jpeg
    1.7 MB · Views: 6
  • IMG_1441.jpeg
    IMG_1441.jpeg
    1.8 MB · Views: 5
Last edited:
I don't think rotating the shaft is a good idea ever. The lubrication holes for the rockers would then be on the top where the largest clearance is. So you may get a drop in oil pressure, but for sure you would have absolutely no lubrication on the bottom where the two surfaces are rubbing together. Gone in 60 seconds, I think. That "fresh unworn surface for the rocker arms to ride against" would be melted before you ever got the valves adjusted. Even if you drilled new holes for the new bottom, you would have a lot of wasted oil pressure from the top holes.

Hmmm... Since the top is not a contact surface, drill through the hole to make a new hole 180 degrees around. Then a quick mig weld and then a concave grind to plug the holes. Adjust the location of the supply holes and now you just may have a new set to shafts! I think I have my new test project.

First photo is of the underside where the surfaces have the high rubbing pressure. Second photo is the topside. Notice the first rocker has so much clearance on the top, even the scum is not rubbed off.
I wasnā€™t quite clear but what I meant was flipping the shaft front to back. My only concern about turning it upside down is if you have a lot of wear like mine the clearance at the top of the shaft with the rocker bushing is exaggerated and would this cause an oiling problem. The oil holes in the rocker are at the top.....would you have most of the oil leaking out around the shaft and not getting pushed through the rocker? I think drilling and filling holes would be the lesser problem as to how to build back the worn areas of the shaft. Or is that not critical? Yes....time to experiment as I have a worn out shaft too.
 
I wasnā€™t quite clear but what I meant was flipping the shaft front to back. My only concern about turning it upside down is if you have a lot of wear like mine the clearance at the top of the shaft with the rocker bushing is exaggerated and would this cause an oiling problem. The oil holes in the rocker are at the top.....would you have most of the oil leaking out around the shaft and not getting pushed through the rocker? I think drilling and filling holes would be the lesser problem as to how to build back the worn areas of the shaft. Or is that not critical? Yes....time to experiment as I have a worn out shaft too.
Of corse if you can get a new rocker arm shaft or were able to rebuild the worn surface back to its factory spec, plus new rocker arm bushings, or you get a compleate rebuilt rocker arm assemblely than that is always the very best solution. If you ever took the valve cover off of a 216, 223, or 262, and actually watched those rocker arms operating (with a excessively worn rocker shaft and or also with worn out rocker arm bushings) this wear is always located on the bottom side of the shaft or in severe cases also in the same bottom location of rocker arm bushing too. This is because the solid cam's valve lifter is pushing up the push Rod on the adjuster side of the rocker arms. Plus on the other side of the rocker arm it is pushing against the pressure of the valve springs again the force of both sides is pushing the rocker arm straight up against the bottom of the rocker arm shaft. In these cases when there is excessive wears you can accually see the rocker arm bouncing up and down as the engine is running. I have seen this many many times over the years that I also know it's unique sound when I hear this extra valve train noise, once you worked on lots of these old Ford six engines you can hear it right away.

The reason for turning the old rocker arm 180 so the bottom is at the top is because this gives you a fresh surface for the rocker arm to work against and there isn't all that excessive clearance between the shaft and rocker arm as before this can buy you some time until you can find a better fix. As far as the oiling yes the best way is to have the oil passage on the bottom this is also very easy to do and as far as the oil pressure being less sorry this isn't the case since the shaft is all ready worn there isn't much difference anyway. Stock these engines don't receive full oil pressure unless you mod the system so that they will get full oil pressure which is much better to keep the valve train parts from wearing out as fast, this was a common mod also done to the Ford Y Block V8's too. That said it's still much better for engine performance since the rocker arm isn't bounceing up and down anymore and the Rocker Arm is then delivering the Camshafts full valve lift again giving back the engines lost power and performance. On those engines with the Stanard adjustable rockers arms it is very hard to even adjust the rocker arm lash with a worn out rocker shaft if the lash is to tight you loose engine power and if the rocker arm lash is too loose then you will have excessive valve train noise. In any case if you don't at least clean out the inside all of the engine blocks and heads oil passages ways up to the rocker arm shaft, the inside of rocker arm shaft, and each of the rocker arms passages so you can get decent oil flow again and the oil return going back to the oil pan then it's not going to gain you much time before you will have trouble again. Best of luck on your 223 six.
 
So I acquired my grandfathers 55 f100 this weekend and at some point my father cracked the head and threw the old one out šŸ¤·ā€ā™‚ļø unfortunately so he put a head from a 58 on there and to his credit it does work but the valve cover doesn't bolt on well so I'm contemplating the idea of replacing the head since it isn't correct or original. The rest of the truck was restored to original, so I don't really want to modify it alot. But... I want an economic solution to more power. I thinking an aluminum head? Maybe a turbo? I've always wanted to turbo a strait 6, though from what I've read, the 223 isn't the best choice, thoughts?

Does anyone have a head for this for sale?
Iā€™m in the same boat as you also acquired my grandfathers truck a ā€˜61 F100 that has the 223.
I decided to go with the Cliffords package just stuck on carb choice. Itā€™s at a machine shop now as soon as itā€™s done Iā€™ll post some specs. Itā€™s tough with the 223ā€™s not as much out there for info but thanks to many on this forum Iā€™ve learned a ton! Good luck with your build!
 
Just thinking out loud here;
if you were to turn down the rocker shaft and bore fresh bushings from pressed in solid brass to fit the smaller shaft, wouldn't it be not only tight, but also just as easy to offset the bushing when it is bored and change the rocker ratio?
I mean, if you are going to end up spending money in a machine shop, why not gain some power while you are at it?
 
A bit more complicated....you need the groove cut around the middle inside and a hole in the groove at the top (not shown). The rockers are available with a bit of hunting/patience. Seems the better solution would be to machine a new shaft to fit a NOS set of rockers. The shaft also has to fit the six shaft towers so any change to the shaft diameter would require a change here too.
 

Attachments

  • 3CC22472-55C9-4AE4-AE1B-569D17C83139.jpeg
    3CC22472-55C9-4AE4-AE1B-569D17C83139.jpeg
    638.5 KB · Views: 2
O
OK if the rockers can be found then a fresh shaft would be great.
Would grooves in the shaft at each rocker help?
 
Rocker Arms Unlimted is a good sorce to have the Rocker Arm assemblies rebuilt, they do this for many engines. http://www.rockerarms.com/pages/performance.html
They may also maybe able to mod the stock rocker arms for a Higher Ratio too, they do this on the Ford small six engines (as well as many others) by modding the stock 1.5 to 1 Ratio Rocker Arms into a 1.6 to 1 Ratio.
 
Guys this thing is turning into a headache. So I removed the thermostat and used a water hose and rinsed loads of rust out of the engine cooling passages around the pistons. I mean more than can possibly be good. I put a magnet at where the thermostat was to catch the rust as I tried to flush it out. I flushed it back to front until I wasn't getting large particles anymore. This im sure is the reason it was over heating, which means my heater core and radiator are probably stuffed up. I'll probably install a magnet in that hose to catch anything else. I also ordered NOS head bolts for the second time, hopefully they arrive this time.

I intend to use copper coat on this gasket and loctite 592 on the through bolts (head bolts) I am probably going to use the holley carb on it until I decide whether or not it will run right (not over heat) and it I can pull that off, I'll probably put the Holley sniper on it. But it's a little pricey considering idk if the motor is gonna sort out yet.
 
Back
Top